"C" is for cookie, that's good enough for me! ~ Cookie Monster
My mom also made several batches of cookies, but she went for a wider variety. Growing up, each tin in our kitchen held a different, unique, sugary delight ... at least until we started sampling. We had our favorites that would be gone in a snap! And we had the sweet treats we savored for the sheer amount of work that went into them. Once a year, we had a cookie with every meal ... just to make sure none of them went bad! :)
This year, I had some extra help in the kitchen making our cookies and for the most part, it truly was helpful. A few weeks prior, I took a poll of which cookies each person wanted me to make. I think we got them all made, and there are still a few left in the tins.
I'm certain that you have probably done all the holiday baking you are going to this year. But just in case you have one more tin that needs filling ... I thought I would share with you some of our family favorites.
 |
| No ... this wasn't my snacky plate. :) |
Chocolate Covered Pretzels
(We have given these as gifts to neighbors, teachers and friends the past several years ... always a big hit!)
2 bags of chocolate chips
Sprinkles
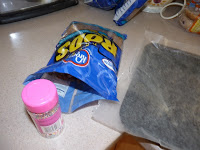
Sort through the pretzels and make two piles: the pretzels that are whole and the pretzel bits. You'll use both. Next, line a cookie sheet with waxed paper and set it nearby.
 |
| Ready to melt ... |
 |
| Creamy and smooth. |
If you have a double boiler, use that to melt the chocolate. If you don't have a double boiler, follow along. Fill a medium-sized pot with water and put it to boil on the stove. Choose a glass bowl that will sit on top of the pot, but not fall inside. Once the water is boiling, set the bowl over the pot, making sure that the water doesn't touch the bowl. You only want the steam to heat the bowl and melt the chocolate. Dump the chocolate chips in the glass bowl and stir it periodically. In about 8-10 minutes you will have creamy melted chocolate. Turn the heat down, but you want to keep the bowl over the hot water to keep the chocolate from cooling. Next, it's time to dip.
 |
| photo by Norah :) |
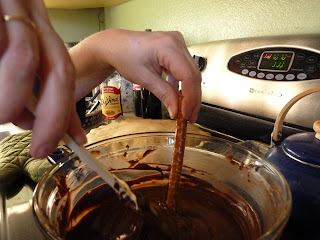
I use a rubber spatula to lift the melted chocolate up the sides of the pretzel. One hand turns the pretzel and the other hand makes sure to apply a generous coating of chocolate. Let any extra chocolate drip off the pretzel and then transfer it to the waxed paper. Sprinkle the chocolate end with colored sprinkles and then one to the next one.
When the cookie sheet is full, place it in the freezer to cool. I layered about four sheets of waxed paper on top of each other - each full of chocolate covered pretzels.
 |
| So pretty ... and pretty tasty! |
We also dipped the broken pretzels for littler bites ... and graham crackers, too. Apparently, you can dip just about anything in melted chocolate!
Once you have all the pretzels cooled, you can transfer them to a ziplock bag for storage. Just keep the bag from any heat source so that they all don't melt together. Not that I'm speaking from personal experience or anything. :)
To make fun and easy gifts, you can buy little cellophane bags at Wal-Mart, Hobby Lobby and Michael's. We slid four pretzels in each bag and attached a holiday tag. Simple and sweet!
Mexican Wedding Cakes
(These sugary little bites explode in your mouth ... leaving powdered sugar on your shirt as evidence.)
1 cup butter, softened
1/2 cup powdered sugar
1/2 t. vanilla
2 1/4 cup flour
In a large bowl, cream together the butter and sugar. Add the vanilla, flour and nuts. Chill the dough in the fridge until firm. (I made up the dough the night before so that we could bake them in the morning.) Roll about 1 T. of dough into a ball and place it on an un-greased baking sheet. Bake at 350 degrees for about 20 minutes. When they are cooled completely, roll them in powdered sugar.
My mom would often double the recipe because they were our favorites!
Shortbread Cookies
(This is one of Brett's favorites ... and mine, too. And I'm not sure that is a good thing!)
1 lb. + 4 T butter
2 cups powdered sugar
5 cups flour
Yep ... butter, sugar and flour. That's it.
Yep ... butter, sugar and flour. That's it.
In a large bowl, cream the butter until it's smooth. Add the powdered sugar and continue mixing until smooth. If you are using a mixer, go slow or the powdered sugar will fly right back out and you'll be covered! Gradually add the flour and mix well. You might have to finish mixing with a wooden spoon because the dough gets pretty stiff. (Another reason I love my KitchenAide!)
 |
| This is also how the Mexican Wedding Cake dough looked. FYI |
 |
| Ready to chill ... |
 |
| Ready to bake. |
Slice the log in about 3/4 inch slices and bake them on an un-greased cookie sheet at 300 degrees for 25-30 minutes. They will be slightly browned on the bottom. Once they are cooled to the touch, dip them in granulated sugar for the finishing touch!
Coconut Dream Bars
(This recipe is from my mom's grandma. Like little pecan pies ... yum!)
Crust:
1 cup flour
1/8 t. salt
1/4 cup butter
1/4 cup brown sugar
Gooey-Goodness:
2 eggs
1 cup brown sugar
1/4 t. salt
1/4 cup flour
1/2 t. baking powder
1 t. vanilla
1 cup coconut
1 cup nuts, chopped
For the crust, combine the flour, salt and brown sugar. Use a pastry cutter to mix in the butter. Press this mixture into an 8x8 inch pan. Bake at 350 degrees for 15 minutes. Set it aside to cool.
For the gooey-goodness, beat the eggs well. Gradually add the brown sugar, salt, flour, baking powder and vanilla. Make sure it is all well-blended. Stir in the coconut and nuts. Pour this over the crust and bake at 350 degrees for 20 minutes. The top will still be soft and gooey.
 |
| Crust before baking. |
 |
| Gooey-goodness before baking :) |
For the gooey-goodness, beat the eggs well. Gradually add the brown sugar, salt, flour, baking powder and vanilla. Make sure it is all well-blended. Stir in the coconut and nuts. Pour this over the crust and bake at 350 degrees for 20 minutes. The top will still be soft and gooey.
Cut the bars into one inch squares ... and then have two!
Chocolate & Peanut Butter Blossoms
(This recipe is from Hershey's ... Lydia's favorite: chocolately/sticky hands down!)
1 bag Hershey's Kisses
3/4 cup creamy peanut butter
1/3 cup brown sugar, packed
2 T milk
1 1/2 cups flour
1/2 t. salt
1/2 cup shortening
1/3 cup granulated sugar
1 egg
1 t. vanilla
1 t. baking soda
Beat shortening and peanut butter in a large bowl until fluffy. Add 1/3 cup granulated sugar and beat well. Add egg, milk, vanilla; and beat well. In a separate bowl, combine flour, baking soda and salt. Add this to the peanut butter mixture. Combine well.
Shape the dough into 1 inch balls and roll them in a little granulated sugar. (This was Lydia's job.) Place them on an un-greased cookie sheet and bake at 375 degrees for 8-10 minutes. After removing the cookies from the oven, press one Kiss into the center of each cookie. The heat from the cookie will melt the Kiss a bit and secure them together.
Let them sit for a few minutes before moving them to a wire rack to cool.
My two favorite things: chocolate and peanut butter ... fused together!
 |
| I love the sugary crystals! |
My two favorite things: chocolate and peanut butter ... fused together!
Thumbprint Cookies
(This recipe is from SimplyRecipes ... certainly tasty, but a little extra work.)
1 cup butter, room temperature
1/2 cup sugar
2 egg yolks
1 t. vanilla
pinch of salt
2 cups flour
3/4 cup jam (We used our homemade strawberry jam.)
Cream the butter and sugar on high speed for about 3 minutes. Add the egg yolks and vanilla to the egg mixture. Add four and salt and mix until just combined. Chill the dough for about 30 minutes in the refrigerator.
Roll the dough into 1 inch balls and place them on an un-greased cookie sheet. You want to make an indention with your thumb ... just be sure the sides are strong enough to hold the jam. Or ... well ... you'll see. Fill the little well with jam ... but not to over-flowing.
These are tasty ... but look nothing like their picture! :)
 |
| So pretty ... |
Bake the cookies at 350 degrees for 12-15 minutes. Let them cool on the cookie sheet for 5 minutes before transferring them to the cooling rack.
 |
| Hmmmm ... sorta :) |
These are tasty ... but look nothing like their picture! :)
________________________________________________
So ... those are the tasty morsels we have been enjoying.
Just a side note ... If you decide to try your hand at any of these delightful cookies, I can not be held responsible for any extra pounds you might gain this month. But, it's okay ... we'll work them off together!


No comments:
Post a Comment
Thanks for visiting! Your comments are warm fuzzies! (And con-crit is always welcome, too.)